1Compile and generate object file
gcc -c helloworld.c -o helloworld.o
```
gcc 执行 GNU C 编译器。
-c 表示只编译以生成目标文件,而不链接到最终的可执行文件。
$-\circ$ 后跟文件名。标志 -o 告诉编译器输出文件的名称。在本例中,我们希望目标文件 helloworld.o。如果省略 -o helloworld.o,它仍然会创建 helloworld.o,因为目标文件的默认行为是使用与源文件相同的名称,但将扩展名从 .C 更改为 .o。
```
2Disassemble object file
objdump -d helloworld.o
```
objdump 显示一个或多个目标文件的信息。
此信息主要对从事编译工具的程序员有用,而不是只希望程序编译和工作的程序员。
- $d$ 用于反汇编并显示每个机器指令旁边的汇编代码。
8 编译的四个阶段
尽管我们可以用单个 gcc helloworld.c 命令生成 helloworld.c 的二进制文件,但有 4 个阶段在一个黑盒中发生。
- 预处理
- 编译
- 汇编
- 链接
gcc 是主程序,它调用其他可执行文件独立完成任务。
9 编译 (1):预处理
10 预处理指令。
- 扩展 #include 和 #define
- 生成人类可读的源代码
- gcc -E helloworld.c -o helloworld.comp
- cpp helloworld.c -o helloworld.i
```
extern int ftrylockfile (FILE *__stream) __attribute__ ((__nothrow__ , __leaf__)) __attribute__ ((__nonnull__ (l)));
extern void funlockfile (FILE *__stream) __attribute__ ((__nothrow__ , __leaf__)) __attribute__ ((__nonnull__ (1)));
949"/usr/include/stdio.h" 3 4
extern int __uflow (FILE *);
extern int __overflow (FILE *, int);
973"/usr/include/stdio.h" 3 4
5"helloworld.c" 2
6"helloworld.c"
int main() {
printf("%s\n", "Hello, world!");
return 0;
}
```
11 编译 (2):编译
```
.file "helloworld.c"
.text
.section .rodata
.LCO :
.string "Hello, world!"
.text
.globl main
.type main, @function
main:
.LFB0:
.file "helloworld.c"
.text
.section .rodata
.cfi_startproc
endbr64
pushq %rbp
.cfi_def_cfa_offset 16
.cfi_offset 6, -16
movq %rsp, %rbp
.cfi_def_cfa_register 6
leaq .LCO(%rip), %rax
movq %rax, %rdi
call puts@PLT
movl $0, %eax
popq %rbp
.cfi_def_cfa 7, 8
ret
.cfi_endproc
.LFE0:
.size main, .-main
.ident "GCC: (Ubuntu 14.2.0-4ubuntu2) 14.2.0"
.section .note.GNU-stack,"",@progbits
.section .note.gnu.property,"a"
.align 8
```
12 将预处理的源代码转换为汇编代码。
- 生成人类可读的汇编代码。
- gcc -S helloworld.i -o helloworld.s
13 编译 (3):汇编
将汇编代码转换为机器码
- 机器码不再是人类可读的。
- gcc -c helloworld.s -o helloworld.o 或
- as helloworld.s -o helloworld.o
14 编译 (4):链接
链接目标文件并输出最终的可执行文件。
- 生成可执行机器码。
- gcc helloworld.o -o helloworld
15 编译多个文件
- 早期的计算机编译即使是合理大小的软件项目也需要很长时间。
- 因此,代码被分解成更小的编译单元,可以独立地和增量地编译。
- 每个编译单元都编译成一个 .o 目标文件。
- 所有目标文件在最后一步中链接在一起以生成一个可执行文件。
16 编译多个文件
17 考虑以下多源项目。
| $\begin{aligned} & \# \text { ifndef } \quad \text { _ADD_H_ } \\ & \text { \#define _ADD_H_ } \end{aligned}$
\#endif | \#include "add.h" add.c
int add(int x, int y) \{ return x + y;
\} | \#include
\#include
\#include "add.h"
\#include "sub.h"
int main() \{ |
| :--- | :--- | :--- |
| | | |
| \#ifndef _SUB_H_ sub.h
\#define _SUB_H_
int sub(int x, int y);
\#endif | \#include "sub.h" sub.c
int sub(int x, int y) \{ return x - y;
\} | printf("5 + 2 - 3 = \%d\n", sub (add (5, 2), 3));
return EXIT_SUCCESS;
\} |
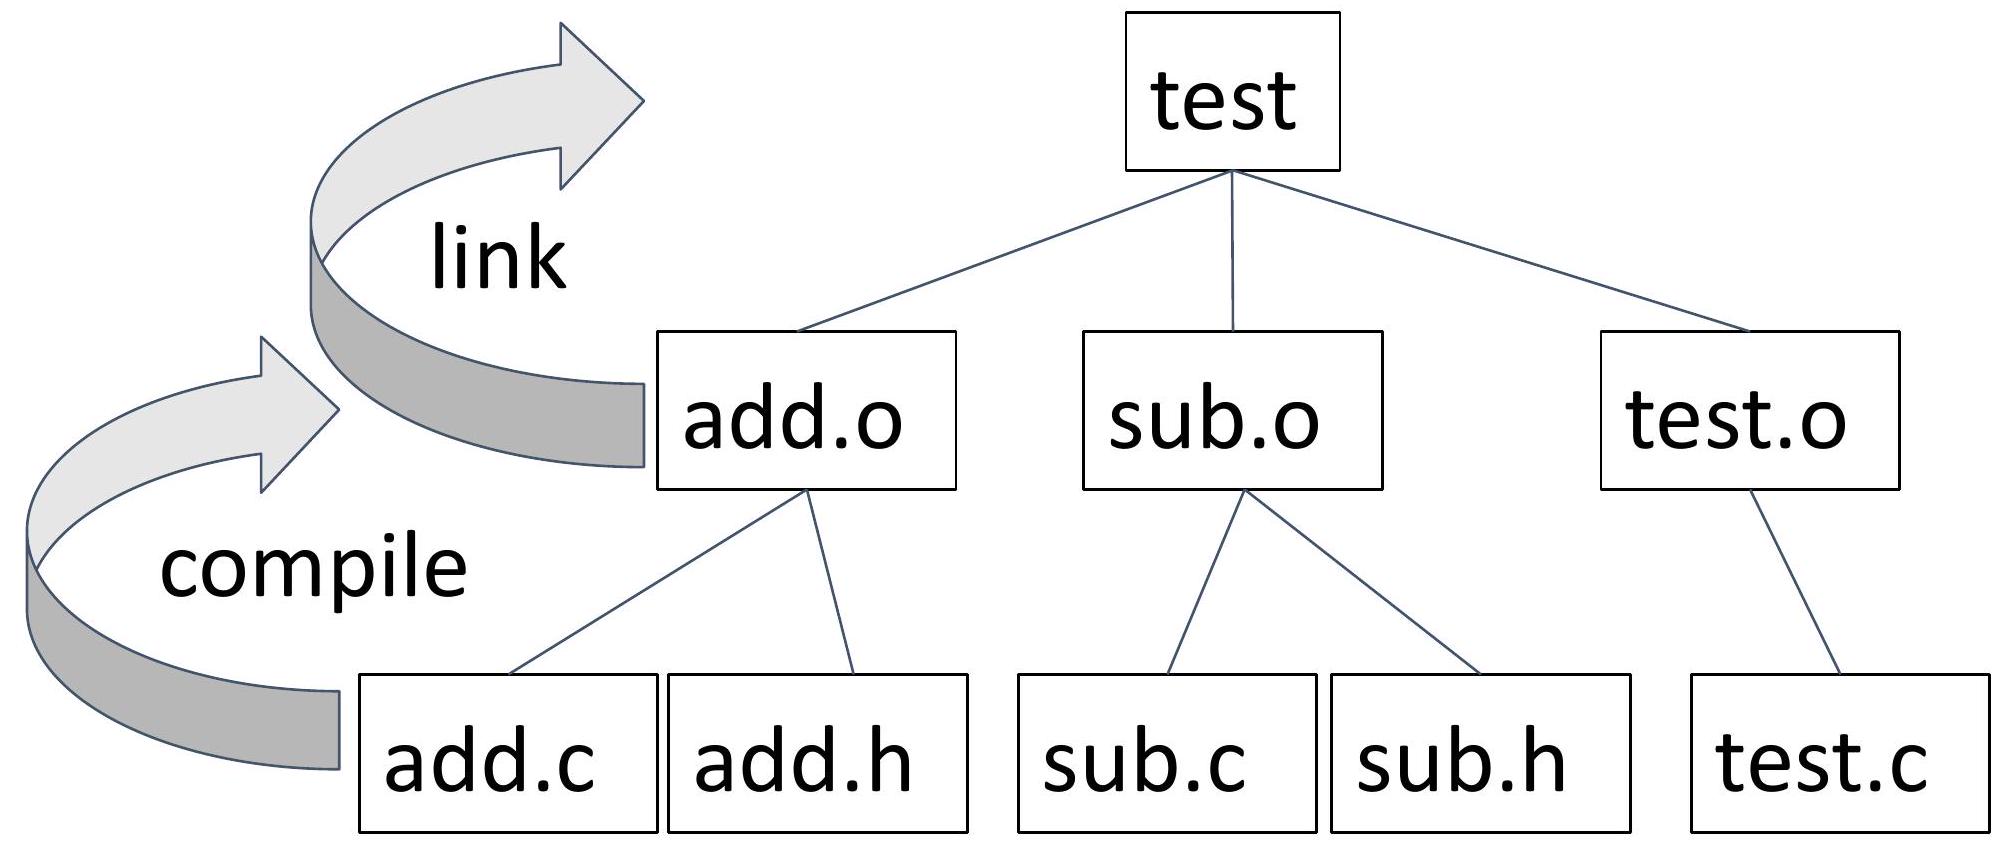
18 编译多个文件
目标是配置构建过程,使每对 .h/.c 文件以及主要的“驱动程序”生成一个独立的 .o 文件。 .o 文件在最后一步中链接在一起。
```
add.c/add.h -> compile -> add.o
sub.c/sub.h -> compile -> sub.o
test.c -> compile -> test.o
add.o sub.o test.o -> link -> a.out
```
(我们也可以更恰当地将 a.out 命名为 test。)
19 依赖图
20 符号和链接器
程序定义和引用符号,或在编译单元之间共享的全局变量和函数。
符号定义存储在目标文件中(由汇编器)在符号表中。符号表是结构体的数组。每个条目包括符号的名称、大小和位置。
当一个目标文件使用在另一个编译单元中定义的符号时,它会为该符号留下一个占位符。
链接器的工作是用对该符号的单一定义的引用填充每个符号占位符。
在符号解析步骤中,链接器将每个符号引用与恰好一个符号定义关联起来。
21 符号和链接器
假设这次,您忘记在程序中包含 main 函数(或以某种方式拼写错误)。
您会收到链接器发出的以下消息:
```
/usr/bin/ld:
/usr/lib/gcc/x86_64-linux-gnu/14/../../../x86_
64-linux-gnu/Scrt1.0: in function `_start':
(.text+0x1b): undefined reference to `main'
collect2: error: ld returned 1 exit status
make: *** [Makefile:12: test] Error 1
```
链接器确保定义了 main 符号。
22 链接器的原因
- 原因 1:模块化
- 程序可以编写为较小的源文件集合,而不是一个整体块
- 可以构建常用函数库
- 例如数学库、标准 C 库
- 原因 2:效率
- 时间:独立编译
- 更改一个源文件,编译,然后重新链接
- 无需重新编译其他源文件(即增量构建)
- 空间:库
- 常用函数可以聚合成一个文件。
- 但可执行文件和运行内存映像只包含它们实际使用的函数的代码
23 隐式函数声明
假设您拼写错了 sub 函数,如右图所示。
编译器会就此隐式函数声明向您发出警告,在现代编译器中,警告会转换为错误以防止编译。
```
#include
#include
#include "add.h"
#include "sub.h"
int main() {
printf("5 + 2 - 3 = %d\n",
subb (add (5, 2), 3));
return EXIT_SUCCESS;
}
```
```
test.c: In function 'main':
test.c:7:32: error: implicit declaration of function `subb’;
did you mean 'sub'? [-Wimplicit-function-declaration]
\n",
\textbf{
sub
make: *** [Makefile:16: test.o] Error 1
```
24 隐式函数声明
在 C 语言中,如果一个函数在没有事先声明的情况下被调用,编译器会假定一个隐式声明,推断该函数返回一个 int 并接受不定数量的参数。虽然这在旧版本的 C 语言中是允许的,但它被认为是不良实践,并可能导致错误。现代 C 标准(C99 及更高版本)不鼓励隐式声明,编译器通常会发出警告或错误。因此,虽然这以前是链接器的任务,但现在它已被推到编译器来首先捕获。
因此,在 C 语言中,函数在被调用之前必须完全定义或至少声明。函数声明或定义必须存在于调用它的函数的“上方”。
```
// program.c - GOOD
// Declare (but not define) the mult()
// function with a function prototype
int mult(int x, int y);
// Define the "main" symbol
int main(void) {
return mult(3, 4);
}
```
```
// program.c - GOOD
// Define the mult() function above
// the main where it is called.
int mult(int x, int y) {
return x * y;
}
// Define the "main" symbol
int main(void) {
return mult(3, 4);
}
```
25 #include
- 如果一个函数需要从多个 C 文件中调用,则必须给出它的原型。
- 将原型放在头文件中使我们能够在需要使用该函数的源文件顶部包含头文件(而不是重复原型)。
- 在 test.c 中,以下行位于文件的顶部:
```
#include
#include
#include "add.h"
#include "sub.h"
```
26 #include
- 预处理器将在 test.c 文件发送给编译器之前,将 stdio.h、stdlib.h、add.h 和 sub.h 的内容复制到 test.c 文件的顶部。
- 所有以 # 开头的 C 预处理指令都只是文本修改。
- #include <filename> 指定预处理器应在标准系统目录中搜索该文件。这些包含是标准 C 库的一部分。头文件包含函数原型,但定义存储在系统其他地方的目标文件中,并由链接器自动链接。
- #include "filename" 在当前目录中搜索该文件。
27 头文件和保护
我们不是在每个使用函数的源文件顶部手动包含函数原型,而是将原型放入头文件中,并在需要该函数的编译单元开始处 #include 该头文件。
回想一下本幻灯片组前面提到的 add.h。
```
#ifndef _ADD_H_
#define _ADD_H_
int add(int x, int y);
#endif
```
头文件的内容放置在上面红色所示的头文件保护之间。我们将使用的约定是文件名(add.h)的大写字符前后都带有一个下划线。
add.h -> _ADD_H_
28 头文件和保护
头文件保护可防止头文件的内容被多次包含在编译单元中。
头文件保护通常使用预处理器指令(#ifndef、#define、#endif)来检查头文件的内容是否已被包含。第一次包含头文件时,#ifndef 条件为真,头文件的内容被包含。第二次包含时,#define 语句已经设置了宏,因此 #ifndef 条件为假,头文件的内容被跳过。
您应该始终在头文件上包含头文件保护。
不要尝试在 .c 文件上使用头文件保护。
29 使用 Make 自动重建
- gmake 指的是 GNU make。
- make 是系统的默认 make 实现,在大多数 Linux 发行版上,它就是 gmake。
- 在 Ubuntu/Lubuntu 中,/usr/bin/gmake 是指向 /usr/bin/make 的符号链接。
- make 在源文件更改后自动重建可执行文件。具体来说:
- 它比较目标文件(可执行文件)与依赖项(源文件)的最后写入时间。
- 如果有任何一个更新(或者目标文件不存在),它会执行与目标文件关联的命令。
30 Makefile
31 make 使用的“配方”存储在Makefile中(例如,“Makefile”)
```
7commented lines begin with #
8'foo' is a target
9'foo.c' is a dependency for foo
10'gcc foo.cpp -o foo' is build command
11command begins with a tab!
12all three taken together form a "rule"
foo: foo.c
gcc foo.c -o foo
```
32 Makefile的优势
- 程序员无需记住(或弄清楚)自上次编译以来哪些源文件已更改。
- make 编译所有已更改的文件。
- 它只编译那些已更改的文件。
- 随着程序大小(文件数量)的增加,它会变得更有用。
33 然而...
程序员仍然需要正确声明依赖关系!
34 规则
- 规则中表达的必要信息:
```
target: dependencies (or prerequisites)
```
- 每条命令行必须以制表符开头(一个不可见字符!)
- 如果 Makefile 包含多个目标,则使用第一个列出的目标,或者...
- 您可以使用以下命令显式构建目标:
```
make <-f makefile> target
```
- 依赖项按其声明的顺序,从左到右构建。
35 编译器标志
36 -g
以操作系统的本机格式生成调试信息。GDB (GNU 调试器) 可以使用此调试信息。
37 -Wall
这会启用所有关于某些用户认为有问题的构造的警告,这些构造即使与宏结合使用也很容易避免(或修改以防止警告)。
38 -Werror
将所有警告转换为错误。(防止编译)
39 -pedantic-errors
当基本标准(参见 -Wpedantic)要求诊断时,在某些情况下编译时行为未定义,以及其他一些不会阻止编译根据标准有效程序的情况下,都会给出错误。
总结:在本课程中,将所有三个 -W 标志与 CFLAGS 和 -g 一起使用,以在编译时捕获尽可能多的错误并使调试更容易。
40 链接器标志
41 LDFLAGS
当编译器应该调用链接器 ld 时,提供给编译器的额外标志,例如 -L。库 (-lfoo) 应该添加到 LDLIBS 变量中。
42 LDLIBS
当编译器应该调用链接器 ld 时,提供给编译器的库标志或名称。LOADLIBES 是 LDLIBS 的已弃用(但仍支持)替代方案。非库链接器标志(例如 -L)应该放在 LDFLAGS 变量中。
43 单源项目的 Makefile
44 宏定义
如果存在名为 all 或 clean 的文件或文件夹,make 将不会执行目标。.PHONY 为我们提供了一种解决此问题的方法。
$(CC) $(CFLAGS) $(LDFLAGS) $(C_FILE) -o $(TARGET) $(LDLIBS)
clean:
rm -f $(TARGET) $(TARGET).exe
限制。
.PHONY: all clean
all:
45 单源项目的 Makefile
假设您的源代码在一个名为 hello.c 的文件中。
Makefile 将使用 wildcard 函数查找与 Makefile 位于同一文件夹中的单个 .c 文件。
函数完成后,C_FILE 宏将被赋值为 hello.c。
patsubst 函数将使用 C_FILE 的值并匹配所有字符直到 .c 扩展名。在这种情况下,匹配结果为 hello,它被赋值给 TARGET。
46 自动变量
-o $@
将编译的输出放在 : 左侧命名的文件中,即该规则的目标。
$<
依赖项列表中的第一个项目。
47 生成 .o 文件
-c 标志表示只编译;不链接。
我们使用 -c 用于需要我们生成目标文件而不是可执行文件的规则。
48 单源和多源项目的通用 Makefile
```
CC = gcc
TARGET =
C_FILES = $(wildcard *.c)
OBJS = $(patsubst %.c,%.o,$(C_FILES))
CFLAGS = -g -Wall -Werror -pedantic-errors
LDFLAGS =
LDLIBS =
```
```
.PHONY: all clean
all: $(TARGET)
$(TARGET): $(OBJS)
$ (CC) $(LDFLAGS) $(OBJS) -O $@ $(LDLIBS)
%.O: %.C %.h
$ (CC) $(CFLAGS) -C -O $@ $<
%.O: %.C
$ (CC) $(CFLAGS) -C -O $@ $<
clean:
rm -f $(OBJS) $(TARGET) $(TARGET).exe
```
49 .PHONY 详情
- .PHONY: all 即使存在名为 all 的文件,也无法按预期工作。
- 如果存在名为 all 的文件,并且存在 .PHONY: all,make 仍然会检查目标 all 的任何依赖项是否为最新。
- 文件 all 的存在并不会阻止 make 评估依赖链,除非目标 all 没有依赖项并且没有被标记为伪目标(如单源 Makefile 中的情况)。
50 理解增量构建
make 会打印它运行的命令。
假设我们按如下方式构建项目:
```
$ make
gcc -g -Wall -Werror -pedantic-errors -c -o add.o add.c
gcc -g -Wall -Werror -pedantic-errors -c -o sub.o sub.c
gcc -g -Wall -Werror -pedantic-errors -c -o test.o test.c
gcc add.o sub.o test.o -o test
If we run make again, nothing happens, since the executable test has a later timestamp than its dependencies.
```
```
$ make
make: Nothing to be done for 'all'.
```
51 理解增量构建
我们可以使用 touch 命令更新文件的最后修改日期。
```
$ touch add.h
$ make
gcc -g -Wall -Werror
-pedantic-errors -c -o add.o add.c
gcc add.o sub.o test.o -o test
```
请注意,add.h 是 add.o 的先决条件。因此,add.o 被重建,然后所有 .o 文件被重新链接以构建 test 可执行文件。
52 理解增量构建
同样,我们可以使用 touch 命令更新文件的最后修改日期。
$ touch add.o
$ make
gcc add.o sub.o test.o -o test
add.o 是 test 可执行文件的先决条件。
没有发生编译。
只需重新链接即可生成更新的 test 可执行文件。大学
53 COMS W3157 中使用的 C 标准
- 我们将在本课程中使用 c17(技术上是 gnu17)。
- 它已在 BB 服务器和本地虚拟机上配置。
- 要验证,请在 shell 中运行此命令:
```
$ gcc -dM -E -x c /dev/null | grep -F __STDC_VERSION__
#define __STDC_VERSION__ 201710L
```
54 调试 Makefile
您可能需要在某个时候调试 Makefile。您可以使用 info 函数打印变量的值。请注意,连续两个 $` 会打印一个 `$ 并阻止引用变量。
```
$(TARGET): $(OBJS)
$(info $$(OBJS) is $(OBJS))
$(CC) $(OBJS) -O $(TARGET) $(LDFLAGS)
```
55 C 语言基础:
56 自定义类型、指针、函数
COMS W3157
Dr. Borowski
57 编码风格
- 对于系统编程,大多数人使用 Linux 内核的风格
https://www.kernel.org/doc/Documentation/process/coding-styl e.rst
- 对于 C 语言编程,请查看 1TBS (1 True Brace Style,K&R 的一个次要变体):
https://en.wikipedia.org/wiki/Indentation style
- 还有许多其他选项可用
- 可能取决于偏好、您正在贡献的项目、您工作的公司等。
- 确保...
- 您的代码可读
- 您保持一致
- 您的代码无论使用何种编辑器都看起来相同
58 C 语言关键字
| auto | break | case | char | const | continue | default | do |
| :--- | :--- | :--- | :--- | :--- | :--- | :--- | :--- |
| double | else | enum | extern | float | for | goto | if |
| int | long | register | return | short | signed | sizeof | static |
| struct | switch | typedef | union | unsigned | void | volatile | while |
有关更多信息,请参阅 https://www.geeksforgeeks.org/keywords-in-c/。
59 C 语言运算符优先级
| 优先级 | | 运算符 | 描述 | 结合性 |
| :--- | :--- | :--- | :--- | :--- |
| | 1 | ++ --
()
[]
.
->
(type){list} | 后缀/后置自增和自减
函数调用
数组下标
结构体和联合体成员访问
通过指针的结构体和联合体成员访问
复合字面量(C99) | 左结合 |
| | 2 | ++ --
+ -
! ~
(type)
*
&
sizeof
Alignof | 前缀自增和自减 ${ }^{[\text {note 1] }}$
一元加和减
逻辑非和位非
类型转换
间接寻址(解引用)
取地址
大小 ${ }^{[\text {note 2] }}$
对齐要求(C11) | 右结合 |
60 C 语言运算符优先级
| 3 | * / % | 乘法、除法和取余 | 左结合 |
| :--- | :--- | :--- | :--- |
| 4 | + - | 加法和减法 | |
| 5 | << >> | 位左移和右移 | |
| 6 | <=
>= | 分别用于关系运算符 < 和 $\leq$
分别用于关系运算符 > 和 $\geq$ | |
| 7 | == != | 分别用于关系运算符 = 和 $\neq$ | |
| 8 | & | 位与 | |
| 9 | ^ | 位异或(异或) | |
| 10 | | | 位或(包含或) | |
| 11 | && | 逻辑与 | |
| 12 | || | 逻辑或 | |
61 C 语言运算符优先级
| 13 | ?: | 三元条件 ${ }^{[\text {note 3] }}$ | 右结合 |
| :--- | :--- | :--- | :--- |
| $14^{[\text {note 4] }}$ | =
+= -=
*= /= %=
<<= >> =
&= ^= |= | 简单赋值
加减赋值
乘除取余赋值
位左移右移赋值
位与异或或赋值 | |
| 15 | , | 逗号 | 左结合 |
有关更多详细信息,请参阅 https://en.cppreference.com/w/c/language/operator precedence.html。
62 类型转换
在 C 语言中,类型转换是一种非常有用的工具,可以将值从一种数据类型更改为另一种数据类型。
为什么我们需要类型转换?
也许我们想要为某个值分配更多内存(例如:int -> double),或者在字母和数字之间切换(例如:char -> int),等等。
类型转换有两种不同的方法:
- 隐式类型转换 - 编译器在没有我们任何编码指令的情况下进行类型转换。
- 显式类型转换 - 当我们明确告诉编译器进行类型转换时。
两种方法的示例将在后面介绍!
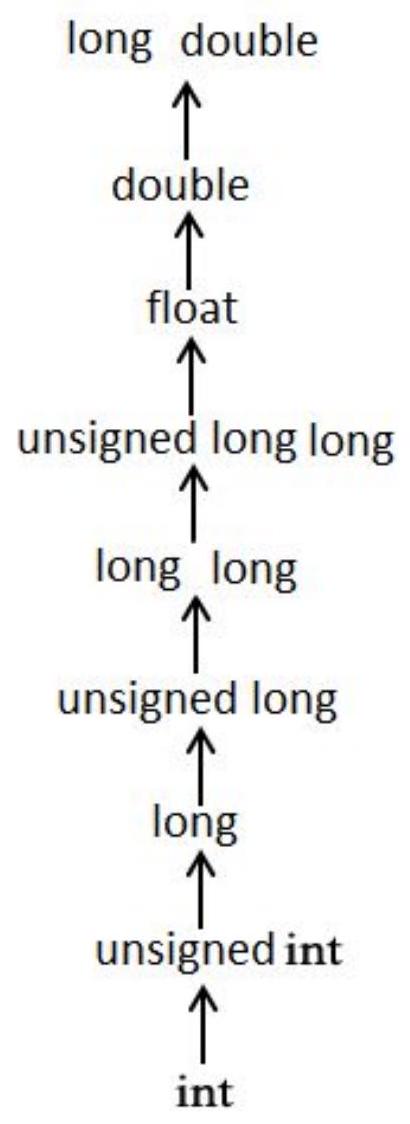
63 隐式类型转换
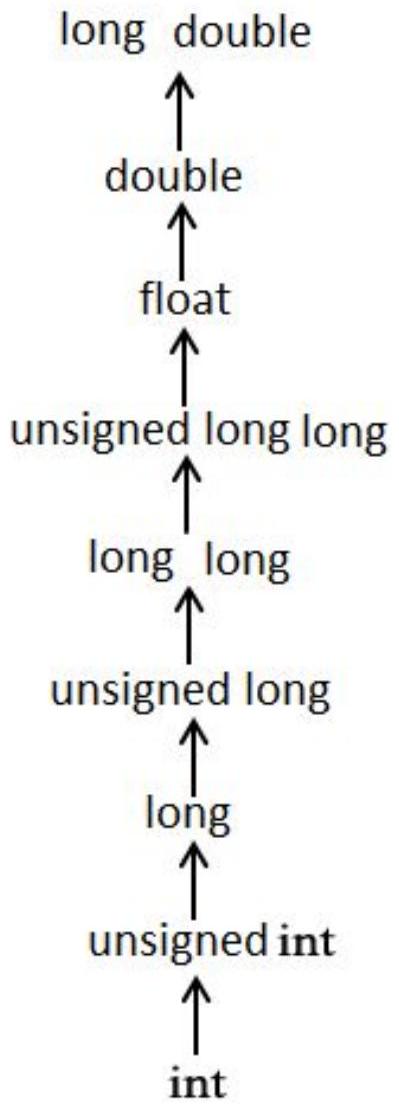
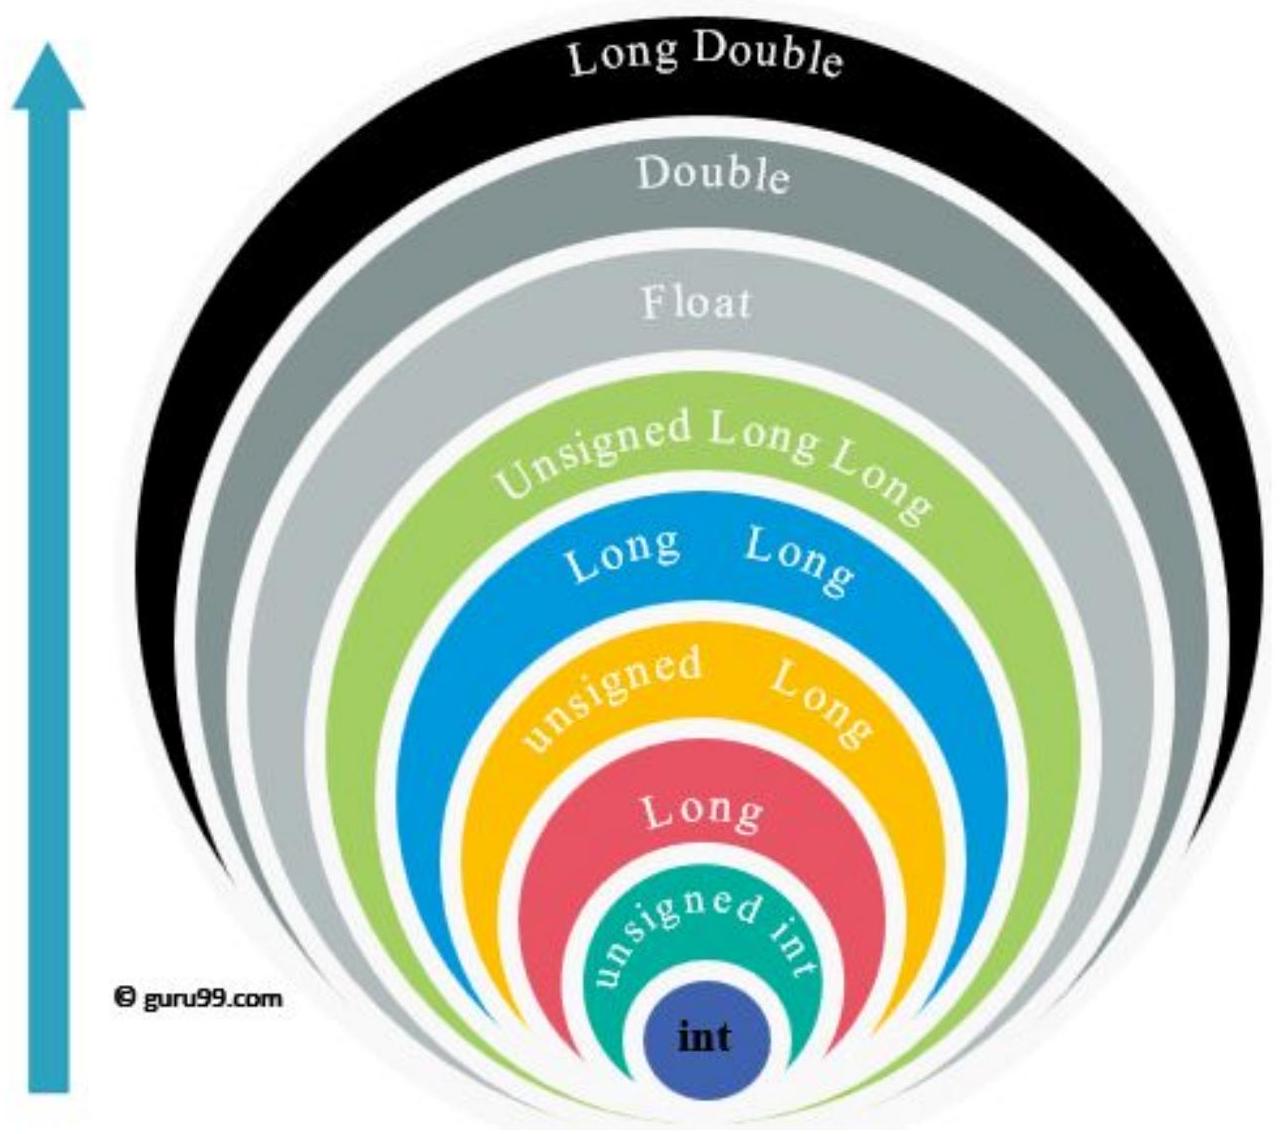
64 隐式类型转换
- 图表向右的移动称为升级,图表向下的移动称为降级。
- 如果变量在新类型中可表示,则升级保证保留变量值。
- 降级可能导致溢出并更改变量的值。
65 隐式类型转换示例
```
int main(int argc, char **argv) {
char var1 = 0x41; // type cast: 0x41 -> 'A'; integer-> char
int var2 = 1.5; // type cast: 1.5 -> 1; float -> integer
// type cast: -1 -> Oxffffffff; signed -> unsigned
unsigned int var3 = -1;
}
```
char c = 0x41424344; c 的值是多少?假设未启用 -Werror=overflow。
66 隐式类型转换示例
```
int main(int argc, char **argv) {
char var1 = 0x41; // type cast: Ox41 -> 'A'; integer-> char
int var2 = 1.5; // type cast: 1.5 -> 1; float -> integer
// type cast: -1 -> Oxffffffff; signed -> unsigned
unsigned int var3 = -1;
}
```
char c = 0x41424344;
c 的值是多少? $16^{1} \times 4+16^{0} \times 4=68$,或 'D' 假设未启用 -Werror=overflow。
67 显式类型转换示例
为了保证 C 语言中的类型转换为新类型,请使用类型转换运算符,其语法为 (new_type) value。
```
int main(int argc, char **argv) {
float f;
int a = 20, b = 3;
f = a/b; // What is f? 6
f = (float)a/b; // What is f now? ~6.666667
```
}
68 通过宏定义的常量
宏通常用于定义永远不会改变并且程序其他部分经常访问的值。
使用 #define
- 示例:#define PI 3.14
预处理器在将源代码传递给编译器之前,将所有 PI 实例替换为 3.14。
```
#define PI 3.14
int main(int argc, char **argv) {
float pi = PI; // pi = 3.14
return 0;
}
```
69 枚举
- 将多个常量组织在一起。
- 第一个成员的值为 0,下一个为 1,依此类推,除非明确指定。
- 示例
- enum boolean {NO, YES}
- 定义 NO 为 0,YES 为 1
- enum months {JAN = 1, FEB, MAR, ... }
- enum escapes {BELL = '\a', BACKSPACE = '\b', ...}
70 枚举的用法
```
enum week { Sunday, Monday, Tuesday,
Wednesday, Thursday, Friday, Saturday };
int main(int argc, char **argv) {
enum week today;
today = Wednesday; // today = ?
return 0;
}
```
71 枚举的用法
```
enum week { Sunday, Monday, Tuesday,
Wednesday, Thursday, Friday, Saturday };
int main(int argc, char **argv) {
enum week today;
today = Wednesday; // today = 3
return 0;
}
```
72 结构体
结构体是变量的集合(可以是不同类型),属于单一类型。
- 它类似于 C++/Java/Python 中的类。
- C 语言中没有类。
```
struct my_struct {
int x;
int y;
int z;
};
```
73 结构体的用法
```
struct book {
int year;
int month;
int book_id;
}; // Do not forget the ";" here.
int main() {
struct book book1; // declare book1 of type Books
book1.book_id = 100; // access member in struct
return 0;
}
```
74 联合体
联合体用于在相同的内存位置存储不同类型的数据。
```
union my_union {
int i;
short s;
char c;
};
```
联合体需要足够的空间来存储其最大的成员。然而,它只能容纳一个信息;对一个成员的赋值会影响其他成员。
my_union 的大小是多少?
75 联合体的用法
```
union my_union { int i; short s; char c; };
int main(int argc, char **argv) {
union my_union test;
int var0;
test.i = 0;
test.c = 'A';
test.s = 16383;
varO = test.c;
}
```
76 数组
- 数组是数据项的集合,所有数据项都具有相同的类型,并使用一个通用名称进行访问。
- 它可以是多维的。
```
Examples of arrays allocated on the stack:
int a[10]; // type name[size1]
char b[10][100];
struct my_struct c[5][10][20];
```
77 数组的用法
```
int main(int argc, char **argv) {
int array[10];
array[1] = 100;
array[2] = 200;
array[3] = array[1] + array[2];
array[0] = 1000; // Is this right?
array[10] = 1000; // Is this right?
}
```
78 数组的用法
```
int main(int argc, char **argv) {
int array[10];
array[1] = 100;
array[2] = 200;
array[3] = array[1] + array[2];
array[0] = 1000; // Yes, arrays are 0-based.
array[10] = 1000; // No, valid indices are 0-9.
}
```
79 数组初始化
数组可以按如下方式显式初始化:
```
int a[3];
a[O] = O; a[1] = 1; a[2] = 2;
// 0, 1, 2 assigned to a[0], a[1], a[2], respectively.
int a[3] = { 0, 1, 2 };
// Same as int a[3] = { 0, 1, 2 }; Size inferred.
int a[] = { 0, 1, 2 };
// Same as int a[3] = { 1, 0, 0 };
int a[3] = { 1 };
// Initializes all 100 elements to 0.
// The first element is explicitly 0, the rest implicitly.
int a[100] = { 0 };
```
80 sizeof()
它是一个看起来像函数的运算符。返回类型或变量的大小(以字节为单位)。
```
int x = 56;
// both sizeof(x) and sizeof(int) return 4
int a[3];
// sizeof(a) returns 12 (3 times sizeof(int))
```
81 指针
(C 语言中最重要的概念之一)
82 高层概述
内存就像一个由字节组成的长数组。
| 72 | 101 | 108 | 108 | 111 | 32 | 65 | 80 | 33 |
| ---: | ---: | ---: | ---: | ---: | ---: | ---: | ---: | ---: |
| 0 | 1 | 2 | 3 | 4 | 5 | 6 | 7 | 8 |
指针存储字节的索引(或字节块的起始地址),称为内存地址。
例如,值为 5 的指针将指向上述示例中的值 32。(细节有点复杂,但这是基本思想。)大学
83 高层概述
| 72 | 101 | 108 | 108 | 111 | 32 | 65 | 80 | 33 |
| ---: | ---: | ---: | ---: | ---: | ---: | ---: | ---: | ---: |
| 0 | 1 | 2 | 3 | 4 | 5 | 6 | 7 | 8 |
如果我们有一个名为 p 的指针,它指向地址 5,我们可以:
- 读取地址 5 处的值 (val = *p)
- 更改值 (*p = new_val)
- 更改指针以指向不同的地址,而不更改指向的内存 (p = p + 1)
84 高层概述
理解指针的关键是理解指针本身存储在内存中的某个位置,所以我们可以有一个指向指针的指针!

地址 3 指向地址 6,地址 6 指向地址 1。
85 指针(实践中)
- 指针是数据对象,存储位于计算机内存中另一个数据对象的内存地址。
- 在 64 位计算机上,指针类型存储一个无符号长整型的内存地址,因此此类型的大小为 8 字节。
- 指针有两种主要操作:解引用运算符 (*) 和取地址运算符 (&)。
- 指针声明示例(从右到左阅读):
int intptr; // 指向一个整型 char charptr; // 指向一个字符型 struct my_struct *structptr; // 指向一个结构体 int intptrptr; // 指向一个整型指针**
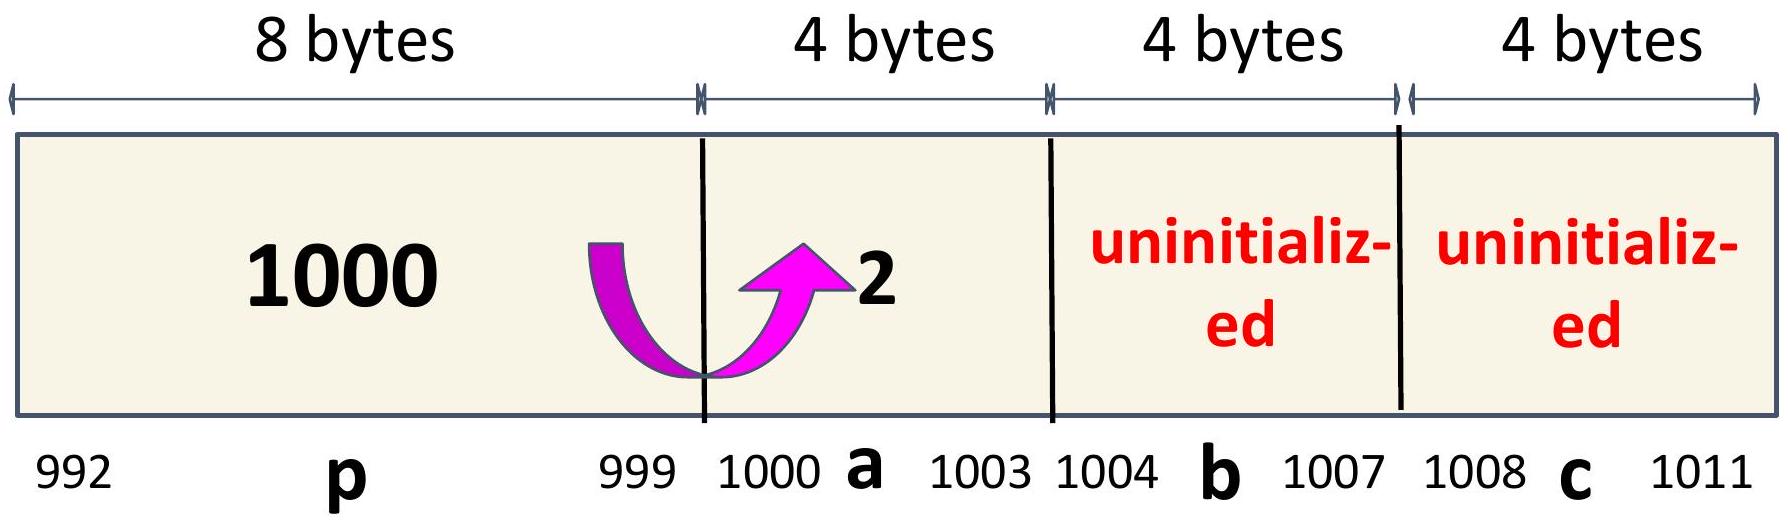
86 指针的用法
| | 8 字节
" | | 4 字节 | 4 字节 | | 4 字节 | |
| :--- | :--- | :--- | :--- | :--- | :--- | :--- | :--- |
| | | | | | | |  |
|
| int *p; int a,b,c; a = 1; | □
uninitialized | | 1 | uninitialized | | uninitialized | |
| | p | 999 | 1000 | 1004 | b | 1008 | C |
- 将计算机内存视为一长串盒子,每个盒子容纳一个字节。每种类型的变量(如 int 或 char)都占用固定数量的这些盒子。
- 指针只是一个变量,它记住内存中另一个变量的地址(或位置)。
- 这使我们能够使用其内存位置查找和操作该变量。
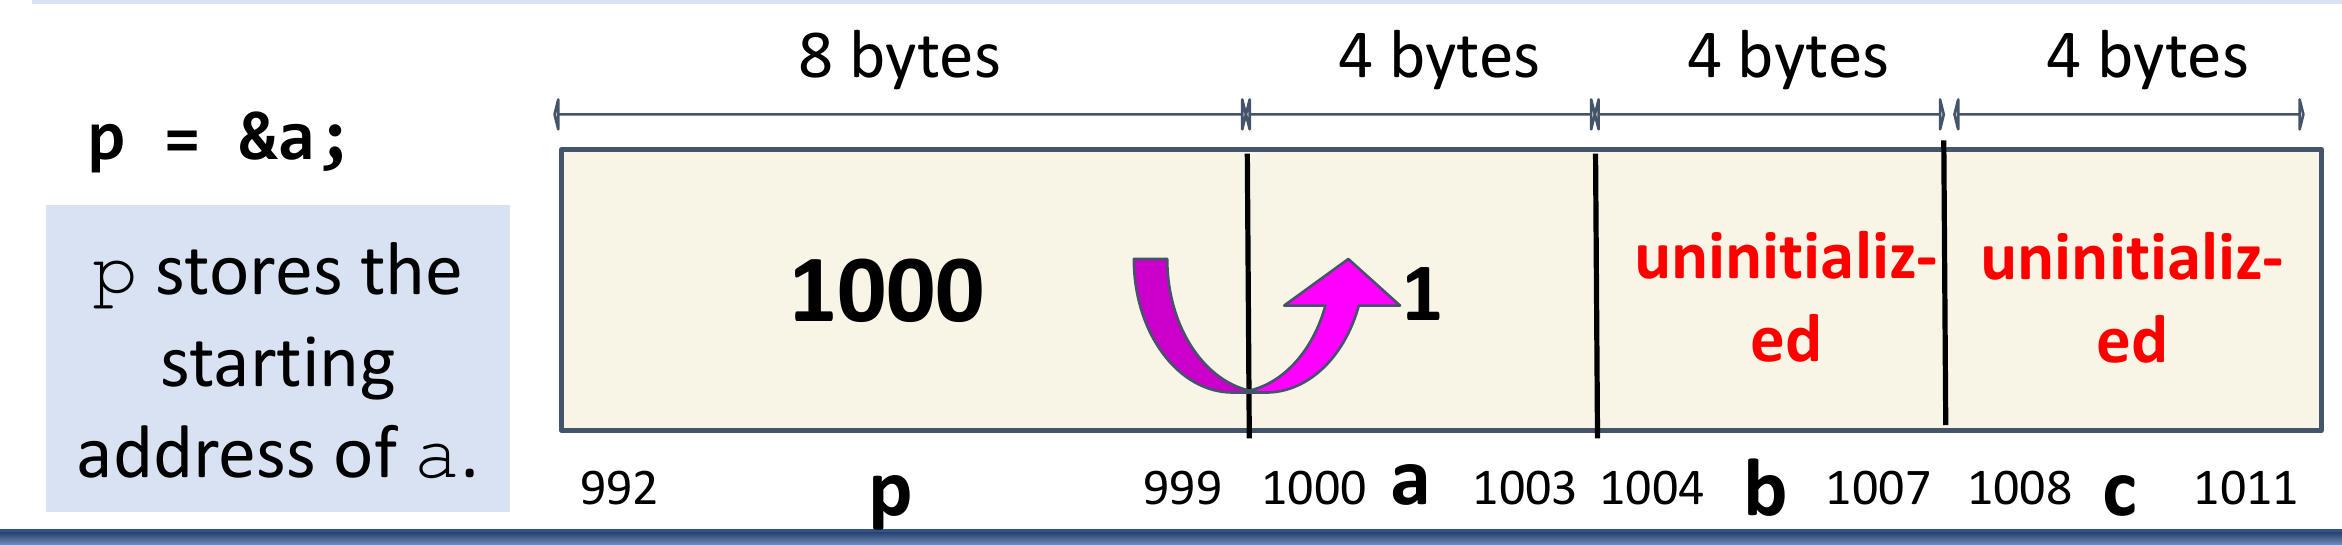
87 指针的用法
由于我们有一个指向 a 的指针,我们可以使用解引用运算符 (*) 访问和修改 a 的值。
这两行具有相同的效果。
*p 等同于说:“跟随粉色箭头并访问那里的值。”
88 指针算术
哥伦比亚
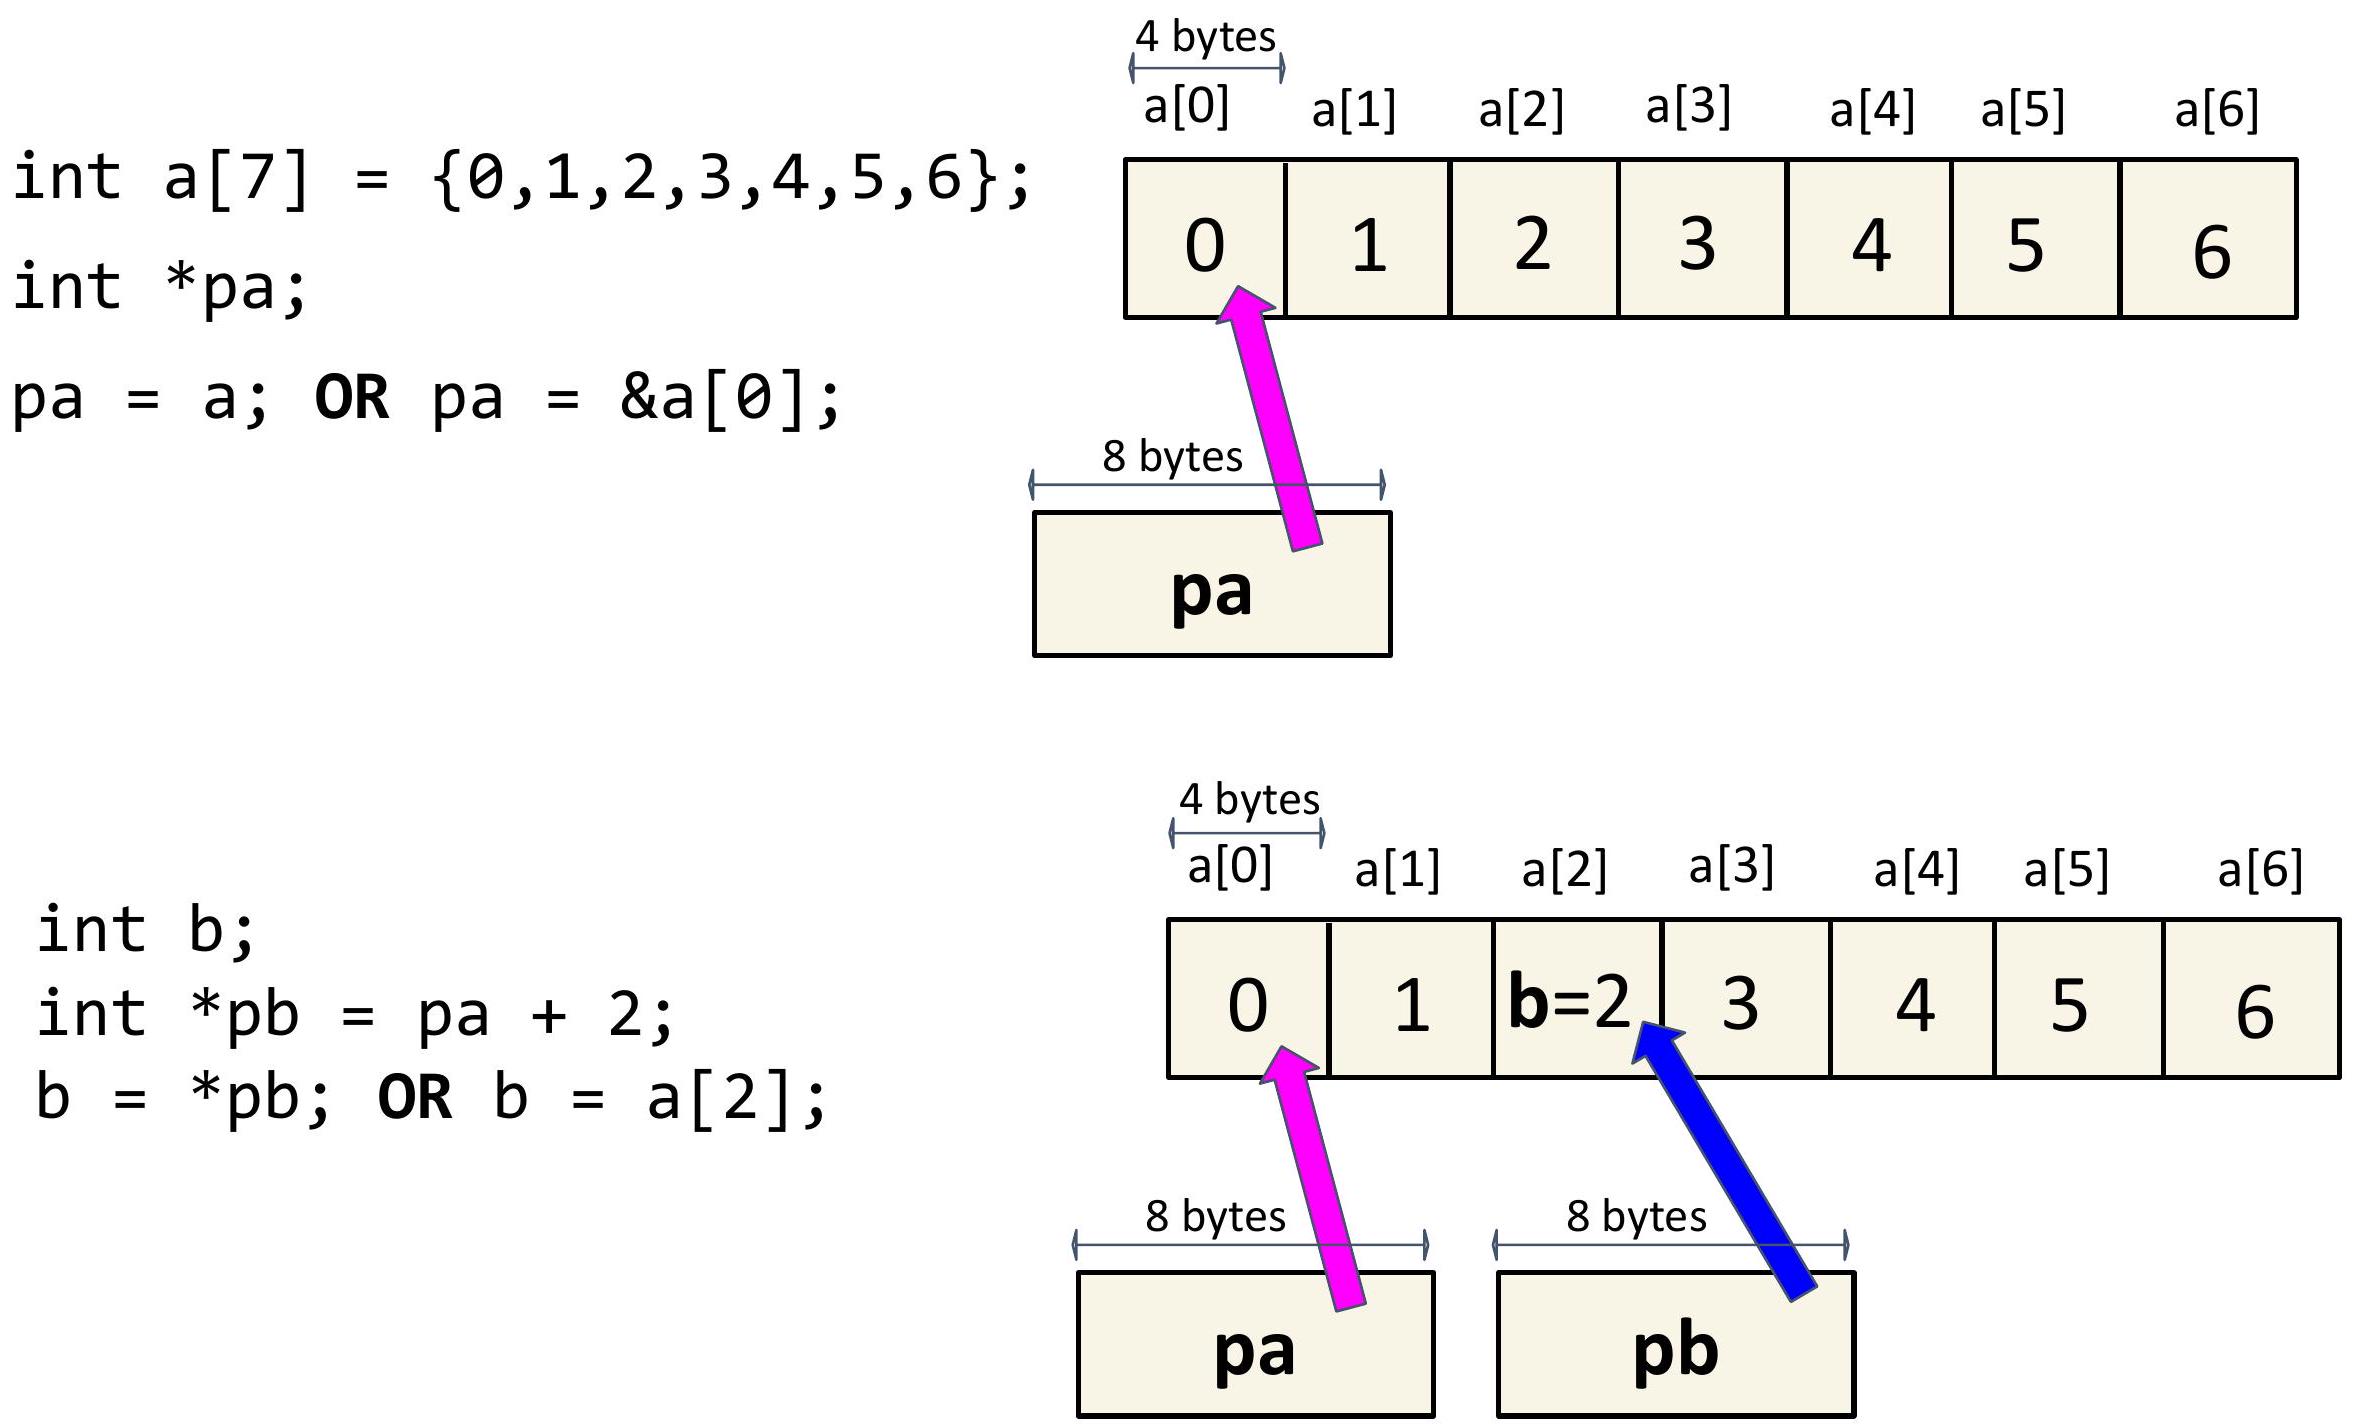
89 指针实现
C 语言中指针的一些更细致的细节:
- 在 C 语言中,数组索引运算符实际上是使用指针定义的。具体来说,a[i] 定义为 *(a + i)。由于 a 只是数组开头的指针,因此添加 i 只是从数组开头开始,递增 i 个元素,并返回在该内存地址处找到的值。
- int i 和一个名为 var_type p 的指针之间的加法定义为 p + i 产生一个位于 p 之后 i sizeof(var_type) 字节的内存地址。这使得上述数组索引运算符能够按预期工作,无论数组类型如何!
90 指针实现
C 语言中指针的一些更细致的细节:
- 与基本类型(如 char 和 int)不同,指针不能在类型之间隐式转换。因此,此代码片段无法编译:
```
int *p;
double *x = p; // compiler error: incompatible pointer types
Instead we should write double x = (double ) p.
```
- C 语言包含一个 void * 类型,可以隐式转换为和从,但不能解引用。也就是说,此代码片段无法编译:
```
void *p;
int x = p; // compiler error: cannot dereference void
```
91 指针实现
C 语言中指针的一些更细致的细节:
- C 语言在 stddef.h 中将 NULL 定义为 0。
- 解引用空指针会编译成功,但会导致运行时错误,因为内存地址 0 通常对 C 可执行文件不可访问。此代码片段会导致分段错误:
```
int *p = NULL;
int x = *p; // segmentation fault at runtime
```
92 定义您自己的类型
```
typedef
typedef unsigned int uint; typedef struct my_struct {
...
} my_struct;
typedef union my_union {
int i;
char c;
double d;
char data[sizeof(double)];
} my_union;
```
类型定义缩短了整个项目中的声明!
93 定义您自己的类型
```
typedef struct book {
int year;
int month;
int book_id;
} book; // do not forget about the ";" here
int main() {
book book1; // struct Book Book1;
book1.book_id = 100;
return 0;
}
```
94 变量作用域 - 局部
变量作用域有三种:局部、全局、静态。这些不同作用域的级别告诉我们从哪里可以访问变量。
- 局部:变量仅在函数内有效。
- 在函数内使用之前定义
- 由编译器分配在程序的栈中
- 在函数顶部定义(ANSI C 要求)
```
void func1() {
int i;
i = 1;
}
void func2() {
i = 1; // invalid scope (we can't access 'i' from
// outside func1 without redeclaring it)
}
```
95 变量作用域 - 全局
- 全局:整个程序可访问的变量。
- 在函数外定义
```
int g_debug_level;
void func1() {
g_debug_level = 1;
}
void func2() {
g_debug_level = 2;
}
void func3() {
g_debug_level = 3;
}
```
96 变量作用域 - 文件静态
- 静态 - 即使在声明它们的先前作用域已退出后,仍保留其值的变量。
- 静态变量有两种类型:
- 文件静态变量 - 与全局变量非常相似,但不能在其定义的文件外部访问。
```
static int g_debug_level; // in file1.c
void func1() { // in file1.c
g_debug_level = 1; // OK
}
void func2() { // in file2.c
g_debug_level = 2; // NOT OK
}
```
97 变量作用域 - 块静态
- 块静态变量 - 工作方式与文件静态变量相同,但它不适用于定义它的块之外的代码(不是全局的)
```
int static_integer() {
static int i = 100;
i++;
return i;
}
int main() {
for (int i = 0; i < 5; i++) {
printf("%d\n", static_integer());
}
}
```
98 函数
声明函数很容易!
```
int my_func(char arg1, int arg2, float arg3);
// return_type, function_name(arguments list)
```
函数可见性:
- 函数可以在程序中的任何地方调用...
- 除非使用 static 关键字,它将可见性限制在定义它们的文件中,例如:
```
static int my_func(char arg1, int arg2, float arg3);
```
99 参数传递 (1)
C 语言只使用传值调用!
这意味着子函数所做的更改不会影响父函数。
```
int main() {
int i = 0;
callee(i);
printf("%d\n", i);
return 0;
}
```
```
void callee(int c) {
c = 10;
}
```
此程序的输出是什么?
100 参数传递 (1)
C 语言只使用传值调用!
这意味着子函数所做的更改不会影响父函数。
```
int main() {
int i = 0;
callee(i);
printf("%d\n", i);
return 0;
}
```
```
void callee(int c) {
c = 10;
}
```
此程序的输出是什么? 0
101 参数传递 (2)
我们还可以使用函数的返回值更新变量的值。
```
int main() {
int i = 0;
i = callee(i);
printf("%d\n", i);
return 0;
}
```
```
int callee(int c) {
c = 10;
return c;
}
```
此程序的输出是什么?
102 参数传递 (2)
我们还可以使用函数的返回值更新变量的值。
```
int main() {
int i = 0;
i = callee(i);
printf("%d\n", i);
return 0;
}
```
```
int callee(int c) {
c = 10;
return c;
}
```
此程序的输出是什么? 10
103 参数传递 (3)
我们还可以使用指针更新变量的值。
```
int main() {
int i = 0;
callee(&i);
printf("%d\n", i);
return 0;
}
```
```
void callee(int *c) {
*c = 10; // dereferencing
}
```
此程序的输出是什么?
104 参数传递 (3)
我们还可以使用指针更新变量的值。
```
int main() {
int i = 0;
callee(&i);
printf("%d\n", i);
return 0;
}
```
```
void callee(int *c) {
*c = 10; // dereferencing
}
```
此程序的输出是什么? 10
105 函数指针
正如我们可以有一个指向内存中其他位置数据的指针变量一样,我们也可以有一个存储函数地址的函数指针,从而允许函数作为参数传递并动态调用。
在本课程中,我们最常使用函数指针来实现多态性。
- 我们可能需要排序一个整型数组、双精度浮点型数组或字符串数组 (char *)。
- 每种数据类型都需要一个不同的比较器函数,需要将其传递给 sort() 函数。
106 函数指针示例
```
#include
int add(int a, int b) { return a + b; }
void say_hi() { puts("Hi"); }
int main() {
// Declare a function pointer that matches the signature of add() function.
int (*add_ptr) (int, int);
// Declare a function pointer that matches the signature of say_hi() function.
void (*say_hi_ptr) ();
// Assign function pointers.
add_ptr = &add; say_hi_ptr = &say_hi;
// Call the functions via their function pointers.
printf("%d", add_ptr(2, 3));
say_hi_ptr();
return 0;
}
```
107 传递函数指针
```
/**
- Integer comparator. Returns > 0 iff a > b; < 0 iff a < b; 0 iff a = b.
*/
int int_cmp(int a, int b) {
if (a > b) {
return 1;
}
if (a < b) {
return -1;
}
return 0;
}
int binary_search(const int key, const int *values,
const size_t num_elems, int (*cmp) (int, int)) {
...
int result = cmp(key, values[mid]);
}
int array[] = { 1, 4, 7, 18, 90 };
int retval = binary_search(4, array, 5, int_cmp);
```